The new version!
We were able to gain some experience through the first version of RevPiModIO and suggestions from the community (many thanks to you ALL). We put these in the new syntax of the RevPiModIO2!
What will be better with version 2?
Important for instantiation!
An instance of the new RevPiModIO2 offers many class attributes and has a slight change in the keyword parameters!
Keyword auto_refresh=True is now autorefresh=True
# Old syntax: Instantiation with autorefresh
import revpimodio
rpi = revpimodio.RevPiModIO(auto_refresh=True)

# New syntax: Keyword auto_refresh is autorefresh now !!!
import revpimodio2
rpi = revpimodio2.RevPiModIO(autorefresh=True)

# Autorefresh update rate / cycletime
rpi.cycletime

# Communication errors with piControl
rpi.ioerrors

# Should an exception be thrown at a certain number of erros?
rpi.maxioerrors = 0  # Never throw an exception (default value)

rpi.maxioerrors = 10  # Throw exception after 10 errors
Syntax for IO accesses
If you wanted to read the value of an IO, the following cryptic work with constant square brackets and quotation marks was necessary:
rpi.devices ["dio02"] ["ioname"]
With the new module we bring the io class, which contains ALL IOs as attributes. This makes access significantly easier to program: rpi.io.ioname.value
This change can be up to 45% faster (cProfile measurements with RevPi-Core1)!
As you can see, we removed another annoying procedure: Specifying the device on which the IO is located. In piCtory the names of the IOs must be unique over all devices, so it doesn’t matter on which device the IO is.

Syntax for starting the loops
Starting the cycleloop or mainloop has been moved from the devices class directly to the RevPiModIO class.
Old syntax
rpi.devices.cycleloop(zyklusfunktion)
rpi.devices.mainloop()
New syntax
rpi.cycleloop(zyklusfunktion)
rpi.mainloop()
Syntax for device access
If you want to work with a single device from the RevPi, this is done via the new device class. This includes all devices as attributes (if unique names are configured in piCtory): rpi.device.dio02
Otherwise, you can access the device using the position number: rpi.device[32]
Syntax to register new IOs
If you wanted to register new IOs in RevPiModIO for gateways or virtual devices, you had to move over the devices class to the device and had the functions .reg_inp(...) / .reg_out(...). Here a Bit will be registered to a Byte of the virtual device “virt01” as new input “p_schnell”: self.rpi.devices["virt01"].reg_inp("p_schnell", "pbit0_7", "?", bit=7)
This function has been removed and each IO now offers the replace_io function. With the new syntax, you just have to write: self.rpi.io.pbit0_7.replace_io("p_schnell", "?", bit=7)

Syntax to register an event in the event handler
The functions .reg_event(...) and .unreg_event(...) were moved from the devices to the IOs. You can now directly use the .reg_event(...) and .unreg_event(...) function for each IO attribute of the .io class. You just have to pass the function which should be executed.
Here the comparison between the old version (above) and the new version (below):
self.rpi.devices["di01"].reg_event("t_start", self.evt_start, edge=revpimodio.RISING)
self.rpi.io.t_start.reg_event(self.evt_start, edge=revpimodio2.RISING)
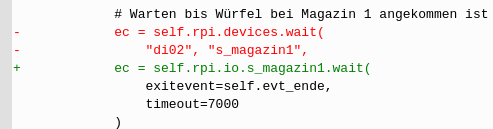
Syntax to wait for an IO to change
The use of the .wait(...) function has changed a lot. It was part of the class devices and needed a lot of parameters: rpi.devices.wait("di02", "s_magazin1"). It now belongs to the IOs aswell, which are addressed by the attributes of the io class: rpi.io.s_magazin1.wait().
The new version is available for download.